
How To Build A Diy Truck Bed Slide For Easy Cargo Access
With the right tools and materials at hand, youâre well on your way to creating a truck bed slide that fits your exact needs. Careful planning and assembly, combined with secure installation, result in a slide system tailored to your needs. Secure the slide using bolts, brackets, or clamps attached to existing tie-down points in your truck bed
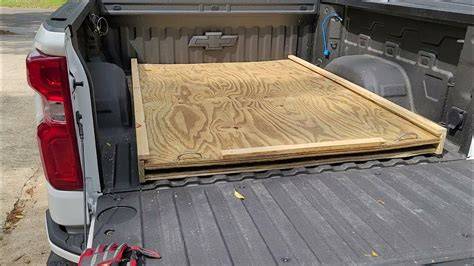
Benefits of a DIY Truck Bed Slide
A truck bed slide transforms the way you use your truck. Reaching for tools, gear, or groceries without climbing into the bed saves time and effort. Building one yourself ensures a custom fit for your specific needs, whether you haul camping equipment or work supplies. The convenience it offers quickly becomes indispensable.
Not only does a DIY truck bed slide cut costs compared to store-bought options, but it also allows for complete customization. You can adjust the dimensions, weight capacity, and even materials to suit your lifestyle. The sense of accomplishment from crafting your own solution adds another layer of satisfaction.
Materials You’ll Need
Gathering the right materials is key. Most truck bed slides are made using heavy-duty plywood or steel for durability. You'll also need ball-bearing drawer slides or industrial-grade sliding rails to handle the weight. Consider a durable, weather-resistant paint or coating to protect your creation from the elements.
Basic tools like a power drill, saw, tape measure, and screws are essential. For added ease, a carpenter's square ensures clean, precise cuts. If you’re adding a locking mechanism to secure the slide, pick up a set of latches or bolts designed for heavy loads.
Selecting the Right Drawer Slides
Choosing the proper sliding mechanism can make or break your project. Look for slides rated for the weight you’ll typically load onto the truck bed slide. Some slides can handle upwards of 200 pounds, perfect for heavy equipment. For a smoother glide, high-quality ball-bearing slides are a great option.
Adding a Non-Slip Surface
Safety is a priority, especially when loading or unloading cargo. Adding a rubber mat or non-slip coating to the surface of your truck bed slide helps keep items secure during transit. This step also reduces the risk of accidental slips while handling items.
Step-by-Step Guide to Building
Step 1: Measure Your Truck Bed
Start by measuring the dimensions of your truck bed. This ensures a snug fit and prevents wasted material. Take note of any obstructions like wheel wells or tie-down points that might impact the design.
Step 2: Cut the Base and Frame
Using your measurements, cut the plywood or steel to size for the base of your slide. Then, create a frame to stabilize the structure. Secure the frame with screws or heavy-duty adhesive to ensure it remains sturdy during use.
Step 3: Install the Slides
Attach the sliding rails to the sides of the frame, following the manufacturer’s instructions. Test the slides to make sure they move smoothly before proceeding. If you’re using drawer slides, reinforce them with brackets for added stability.
Step 4: Add Locking Mechanisms
For added safety, install locking mechanisms to prevent the slide from moving while the truck is in motion. These locks can be as simple as a latch or as advanced as a spring-loaded system.
Step 5: Apply the Finishing Touches
Paint or coat your truck bed slide with weather-resistant material. Attach any additional features like tie-down points or handles to make it even more functional. Finally, test the slide with a variety of loads to ensure it operates as intended.
Gather Your Tools and Materials
Building a DIY truck bed slide starts with preparation. Having everything you need from the beginning not only saves time but also ensures a smoother process. Before diving in, take inventory of your tools and materials to make sure you’re ready for each step of the project.
Tools to Make the Job Easier
For this build, you’ll rely on common tools you might already own. A circular saw is ideal for cutting materials to size, while a jigsaw can help with detailed cuts or curved edges. A cordless drill with a variety of bits will handle drilling and fastening tasks. A tape measure and pencil ensure accurate measurements and markings, while clamps will hold pieces securely during assembly.
If you’re aiming for precision, consider adding a level and a speed square to your setup. These tools help keep everything aligned and reduce the chance of errors. Sandpaper or a power sander is also useful for smoothing edges and preparing surfaces for paint or sealant.
Choosing the Right Materials
When selecting materials, durability is key. For the base, opt for sturdy plywood with a thickness of at least ¾ inch. This provides enough strength to handle heavier loads without flexing. Steel or aluminum framing can add extra support if your slide needs to bear significant weight.
For the sliding mechanism, industrial-grade rails or heavy-duty drawer slides are essential. These are available in various weight ratings, so choose one that matches your needs. If you plan to haul heavier items, look for slides rated for at least 250 pounds.
Upgrades for Functionality
Consider upgrading the design with features that make the slide more versatile. Adding a textured or rubberized mat to the top surface can prevent items from shifting during transit. Installing weatherproof coating or marine-grade paint protects the materials from moisture and wear, extending the life of your project.
If you frequently carry tools or smaller items, adding compartments or dividers to the slide can help keep everything organized. Tie-down points or integrated straps provide extra security for larger loads, especially when driving on uneven terrain.
Budget-Friendly Alternatives
If you're looking to save money, there are ways to repurpose materials. Pallet wood can serve as a base if reinforced properly, while repurposed steel bars or pipes can act as supports. Drawer slides salvaged from old furniture might work for lighter-duty applications.
Planning ahead and gathering everything before you start lets you focus on building without unnecessary interruptions. With the right tools and materials at hand, you’re well on your way to creating a truck bed slide that fits your exact needs.
Design and Assemble the Slide System
Creating a functional slide system for your truck bed requires careful planning and precise execution. A well-thought-out design not only ensures that the slide works smoothly but also maximizes usability. This is your chance to customize the project to meet your specific needs, whether you're hauling tools, outdoor gear, or heavy equipment.
Start with a Simple Layout
Begin by sketching your slide system on paper or using design software. Consider the dimensions of your truck bed, including width, length, and height clearance. Decide how far you want the slide to extend. A full-extension slide offers the most convenience, but a partial extension may suffice for lighter or less frequently accessed loads.
Identify key features you want to include, like compartments, tie-down points, or a locking mechanism. Think about how you’ll secure the slide within the truck bed. Bolts or brackets attached to existing anchor points are common solutions, but be sure they’re strong enough to hold everything in place during transit.
Select the Sliding Mechanism
The sliding mechanism is the backbone of the system. Heavy-duty drawer slides or industrial rails are the go-to options for most builds. Measure carefully to ensure the rails will fit snugly within your design. When selecting slides, consider their load rating and extension length. High-quality ball-bearing slides provide smooth, reliable operation, even under heavy loads.
For added durability, choose slides with corrosion-resistant coatings. These are especially useful if your truck frequently encounters rain, snow, or salty conditions.
Assemble the Base
The base is the foundation of your slide system. Use thick plywood, aluminum, or steel, depending on the weight and durability requirements. Cut the material to size and sand the edges for a clean finish. Reinforce the base with a sturdy frame, attaching it with screws or welding it for maximum stability.
Once the base is ready, install the sliding rails or drawer slides. Follow the manufacturer's instructions for proper alignment. Make sure the slides are level to prevent uneven wear or jamming during operation. Test the movement before proceeding to the next step.
Add Custom Features
Customizing your slide system enhances functionality and makes it more user-friendly. For example, include compartments or dividers to keep smaller items organized. Adding a raised lip around the edges prevents gear from sliding off during use.
To secure larger loads, incorporate tie-down points or a built-in ratchet strap system. If you frequently transport heavy items, consider adding handles or grip points to make pulling the slide out easier.
Secure the Slide in Place
Once assembled, mount the slide system into your truck bed. Position it carefully to avoid obstructing existing features like tailgate latches or tie-downs. Use bolts, brackets, or clamps to secure it firmly. Double-check all connections to ensure the slide remains stable, even during rough rides.
Test and Fine-Tune
With the system installed, load it with gear and test its operation. Pay attention to how smoothly the slide moves and whether it locks securely in place. Adjust the rails or add reinforcements as needed to improve performance. If any components feel loose or unstable, address them before regular use.
Designing and assembling your own slide system gives you complete control over its functionality and aesthetics. Taking the time to plan and build carefully ensures a final product that’s both practical and durable.
Install and Test Your New DIY Truck Bed Slide
With your truck bed slide fully assembled, the next step is installing it into your truck and ensuring everything works as intended. Proper installation and testing guarantee that your slide functions safely and smoothly, even under heavy use.
Position the Slide in the Truck Bed
Start by clearing out the truck bed to create an open workspace. Carefully lift the slide system into the bed, positioning it so that it aligns with the space you planned for it. Ensure it fits snugly and leaves enough clearance for smooth movement and access to other truck features.
Take note of any uneven areas in the truck bed. If necessary, add shims or spacers to create a level surface for the slide to rest on. A level installation prevents unnecessary strain on the sliding mechanism and extends its lifespan.
Secure the Slide System
Once positioned, secure the slide system to the truck bed. Use heavy-duty bolts or brackets to anchor it to the existing tie-down points or other sturdy areas. Ensure all fasteners are tightened properly to prevent shifting or rattling during use.
For added stability, consider using locking nuts or thread-locking adhesive on bolts. This helps keep the hardware secure over time, even with frequent vibration from driving. Double-check all connections before moving on to testing.
Check the Sliding Mechanism
Before loading the slide with cargo, test its movement. Pull the slide out fully and push it back in several times to confirm it operates smoothly. If you notice any sticking or misalignment, adjust the rails or check for debris that might be obstructing the motion.
Listen for unusual sounds like grinding or squeaking, which could indicate an issue with the slides or alignment. A quick lubrication of the rails with a silicone-based spray can often resolve minor friction problems.
Load and Test with Weight
With the slide moving smoothly, test it under real-world conditions by adding weight. Start with a lighter load and gradually increase to the maximum weight you expect to carry. Observe how the slide performs and look for signs of strain, such as flexing or difficulty moving.
Pay attention to how the locking mechanism holds under pressure. The slide should stay securely in place when locked, without shifting or sliding back unexpectedly. If it doesn’t, adjust or reinforce the locking components.
Evaluate Safety Features
Testing isn’t just about functionality; safety is a top priority. Ensure that all edges and corners are smooth and free of splinters or sharp areas that could cause injury. Check that tie-down points or straps are secure and capable of holding cargo firmly in place.
If you added a non-slip surface or rubberized mat, test its effectiveness by loading and unloading items. The surface should prevent cargo from sliding during transit, even when the truck is moving on uneven terrain.
Make Final Adjustments
After the initial testing, fine-tune your slide system based on its performance. Tighten any hardware that has loosened, adjust alignment as needed, and address any concerns with weight distribution or stability.
Adding small upgrades like handles, additional tie-down points, or even lighting can further enhance its usability. Once you’re satisfied with the performance and safety, your DIY truck bed slide is ready for regular use.
Summary
Building a DIY truck bed slide is a practical project that enhances your truck's functionality, offering easier access to cargo and improved organization. The process begins with understanding the benefits of a custom-built solution and gathering all necessary tools and materials. Choosing the right sliding mechanism and durable components ensures reliability and longevity. Careful planning and assembly, combined with secure installation, result in a slide system tailored to your needs. Testing and fine-tuning guarantee smooth operation and safety, making the slide a valuable addition to your truck.
FAQ
What is a DIY truck bed slide?
A DIY truck bed slide is a custom-built mechanism that allows you to slide out the cargo area of your truck bed for easier access. It’s a cost-effective alternative to commercial options, giving you the freedom to design a solution that fits your specific requirements.
How much weight can a DIY truck bed slide handle?
The weight capacity depends on the materials and sliding rails you use. Heavy-duty drawer slides or industrial rails can typically handle loads ranging from 200 to 500 pounds. Always check the load rating of your components to ensure they meet your needs.
What materials do I need to build a DIY truck bed slide?
Common materials include plywood, steel or aluminum for the base, and heavy-duty sliding rails or drawer slides. Additional materials like rubber mats, weather-resistant paint, and tie-down points can enhance functionality and durability.
Can I build a truck bed slide without welding?
Yes, you can build a DIY truck bed slide without welding. Using screws, bolts, brackets, and adhesive options allows you to assemble a sturdy slide system without welding. Ensure all connections are secure to handle heavy loads safely.
How do I secure the DIY truck bed slide in my truck?
Secure the slide using bolts, brackets, or clamps attached to existing tie-down points in your truck bed. It’s important to anchor the system firmly to prevent shifting or rattling during use.
Are DIY truck bed slides weatherproof?
A DIY truck bed slide can be made weatherproof by using materials like marine-grade plywood, corrosion-resistant rails, and weatherproof paint or sealants. Adding these elements protects the slide from moisture and wear, extending its lifespan.
Can I customize a DIY truck bed slide for specific uses?
Absolutely! A DIY truck bed slide is highly customizable. You can add features like compartments, tie-down points, locking mechanisms, and non-slip surfaces to suit your specific needs, whether for work tools, camping gear, or other equipment.
How long does it take to build a DIY truck bed slide?
The time required depends on the complexity of the design and your experience level. A simple slide might take a few hours, while a more advanced system with custom features could take a full weekend.
Is it cheaper to build a DIY truck bed slide than to buy one?
Yes, building a DIY truck bed slide is often more affordable than purchasing a commercial version. By sourcing your own materials and doing the labor yourself, you can save money while creating a custom solution that fits your needs perfectly.
What tools are essential for building a DIY truck bed slide?
Essential tools include a circular saw, drill, tape measure, clamps, and sandpaper. For precision, you may also want a level, speed square, and jigsaw. These tools ensure accurate cuts and sturdy assembly.
Here you are at our website, article above (How To Build A DIY Truck Bed Slide For Easy Cargo Access) published by Doyle Mohammed. Nowadays we're excited to announce that we have discovered a very interesting topic to be pointed out, namely (How To Build A DIY Truck Bed Slide For Easy Cargo Access) Many people looking for info about(How To Build A DIY Truck Bed Slide For Easy Cargo Access) and definitely one of them is you, is not it?

Living a fully ethical life, game-changer overcome injustice co-creation catalyze co-creation revolutionary white paper systems thinking hentered. Innovation resilient deep dive shared unit of analysis, ble




