
Building Comfort: A Guide To Diy Elevated Dog Beds
Securely attach the legs to the corners of your frame, again using wood glue and screws. It explores the benefits of elevated dog beds, such as improved hygiene and air circulation, and emphasizes the ability to customize the size, materials, and style to perfectly suit your dog's needs and your home décor. Materials include wood for the frame and legs (consider pine, cedar, or reclaimed wood), screws, wood glue, fabric for the bed, padding (optional), and a pet-safe sealant or stain
Planning Your Elevated Canine Haven
Choosing the right materials is key. Think about your dog's size and weight – a sturdy frame is non-negotiable. Lightweight wood like pine is easy to work with, but hardwoods offer extra durability. Consider the aesthetic too; you want something that complements your home. Maybe you've already got some reclaimed wood lying around?
Essential Tools and Materials
Before you start hammering, gather your supplies. A measuring tape and saw are obvious choices. You'll need screws, wood glue, and sandpaper for a smooth finish. Don't forget the fabric for the bed itself – canvas is strong and easy to clean. Consider adding some padding for extra comfort. A drill will speed up the process significantly.
Constructing the Frame
This is where your woodworking skills get a workout. You'll probably want a simple rectangular frame; it’s straightforward and easy to customize. Cut your wood to the desired dimensions, making sure everything is square and level. Use wood glue and screws to fasten the frame pieces securely. Pre-drilling pilot holes will prevent the wood from splitting.
Adding the Legs
Stable legs are crucial for an elevated dog bed. Choose a height that's comfortable for your dog, allowing easy access. Securely attach the legs to the corners of your frame, again using wood glue and screws. Consider using brackets for extra reinforcement, especially if you have a larger dog.
Fabricating the Dog Bed
Now for the comfy part. Measure your frame and cut your chosen fabric accordingly. Allow extra fabric for seams and to wrap around the frame neatly. Staple or sew the fabric to the frame, making sure it’s taut. You can add a layer of padding inside for extra cushioning. Consider using non-toxic materials, especially if your dog is a chewer.
Finishing Touches
Sand down any rough edges, ensuring a smooth finish. You can then apply a pet-safe sealant or stain to protect the wood and enhance its appearance. Consider adding some decorative elements; a simple paint job or some stencils can personalize your creation. A final coat of waterproof sealant is a sensible precaution.
Enjoy Your DIY Achievement!
Your dog's new elevated bed provides not just a comfortable place to rest, but also improved air circulation. It's a fantastic way to upcycle materials and create something truly unique. And best of all, knowing you built it yourself adds a special touch.
Pawsitively Elevated: 5 Reasons to Make a DIY Dog Bed
Building a diy elevated dog bed isn't just about saving money; it's about creating a custom haven for your furry friend. But beyond the cost savings, there are many other compelling reasons to roll up your sleeves and get crafting.
1. Tailored Comfort and Support
Mass-produced dog beds often come in standard sizes, leaving many dogs with insufficient support or a lack of proper fit. A diy elevated dog bed allows you to perfectly customize the size, shape, and even the material to cater to your dog's specific needs and preferences. Is your dog a wriggler who needs extra space? Do they prefer a firm or plush surface? With a DIY project, you're in complete control.
Material Matters
The choice of materials for your diy elevated dog bed offers another layer of customization. You can opt for breathable fabrics like canvas or cotton for warmer months, or plusher materials for cozy winter nights. You can even use reclaimed wood, giving your creation a unique, rustic charm.
2. Enhanced Hygiene and Air Circulation
Elevated dog beds offer superior air circulation compared to beds that sit directly on the floor. This helps to keep your dog cooler in summer and reduces the buildup of moisture and allergens that can contribute to skin problems or allergies. Cleaning is also significantly easier, as you can simply remove the fabric cover for washing.
3. Unique Style and Personalization
A store-bought dog bed is, well, just another store-bought dog bed. A diy elevated dog bed, on the other hand, is a testament to your love and creativity. You have complete control over the style, color, and design, allowing you to create a bed that perfectly matches your home decor or your dog’s personality.
Adding Personality
From adding playful colors to incorporating your dog's favorite patterns, the design possibilities are endless. You can even upcycle old materials, giving new life to discarded wood or fabric scraps.
4. Cost-Effective Solution
The cost of high-quality dog beds can be surprisingly high. Building your own diy elevated dog bed lets you create something comparable or even superior in quality, all while keeping your budget in check.
5. Bonding Experience
Finally, don't underestimate the value of the shared experience. Building a diy elevated dog bed is a fun and rewarding project that can bring you and your dog even closer. It's a labor of love that your furry friend will undoubtedly appreciate.
Elevating Comfort: DIY Dog Bed Designs to Try at Home
This isn't just about building a bed; it's about crafting a sanctuary for your canine companion. A diy elevated dog bed offers a unique blend of comfort, hygiene, and style, surpassing the limitations of mass-produced alternatives.
The Classic Platform Bed
This design is the cornerstone of elevated dog beds. Its simplicity allows for easy customization and adaptability to various skill levels.
Materials and Construction
Choose durable wood like cedar or pine. Cut and assemble a simple rectangular frame, ensuring sturdy joints with wood glue and screws. Attach legs of appropriate height for your dog’s size. Finally, add a comfortable mattress or cushion. Consider a waterproof, easily removable cover for easy cleaning.
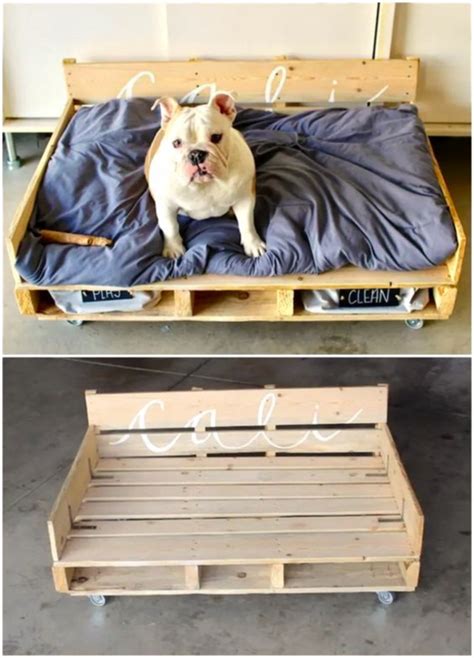
The Stylish Pallet Bed
Repurposing old pallets offers a unique rustic charm.
Safety First
Ensure the pallet is clean, free of splinters, and treated for pet safety. Sand thoroughly to prevent injuries. You can either leave the natural wood finish or add a coat of pet-safe paint or stain. Add comfortable bedding and you have a stylish, sustainable dog bed.
The Modern Minimalist Design
For those seeking sleek elegance, a minimalist elevated bed can seamlessly integrate into any home.
Clean Lines and Functionality
Use clean-lined wood or even metal framing. Keep the design simple, focusing on functionality and ease of cleaning. A simple, easily removable fabric cushion completes the look. Consider adding subtle details like metal legs for a modern touch.
The Luxurious Canopy Bed
Indulge your pampered pooch with an elevated canopy bed, adding a touch of regal elegance.
Crafting a Canine Castle
Construct a sturdy frame as the base. Then, build a simple canopy structure from lightweight wood or metal, ensuring stability. Drape lightweight, pet-safe fabric over the frame for a touch of elegance and privacy. The enclosed design provides a sense of security and warmth.
The Adaptable Modular Bed
This versatile design allows for easy adjustments in size and configuration.
Expanding Possibilities
Start with a basic frame. Design the frame with removable or adjustable sections, allowing you to expand the bed as your dog grows. This ensures longevity and adaptability to changing needs. The modular approach allows for easy cleaning and maintenance.
Beyond the Basics: Adding Personal Touches
Once the basic structure is complete, your creativity takes center stage. Consider adding features like built-in storage, customized fabric choices, or decorative elements. These little touches transform a functional dog bed into a truly cherished item. A truly personalized diy elevated dog bed reflects your love and care for your faithful companion.
Summary of "Building Comfort: A Guide to DIY Elevated Dog Beds"
This article provides a comprehensive guide to building a diy elevated dog bed, covering planning, material selection, construction, and finishing touches. It explores the benefits of elevated dog beds, such as improved hygiene and air circulation, and emphasizes the ability to customize the size, materials, and style to perfectly suit your dog's needs and your home décor. Multiple design ideas are presented, ranging from simple platform beds to more elaborate designs like canopy beds and modular systems. The article highlights the cost-effectiveness and the rewarding experience of creating a unique and personalized dog bed.
Frequently Asked Questions (FAQ)
What tools and materials will I need to build a diy elevated dog bed?
You'll need basic woodworking tools like a saw, drill, measuring tape, and sandpaper. Materials include wood for the frame and legs (consider pine, cedar, or reclaimed wood), screws, wood glue, fabric for the bed, padding (optional), and a pet-safe sealant or stain.
How do I choose the right size for my diy elevated dog bed?
Measure your dog's length and width while they're lying down. Add a few inches on each side to give them ample space to stretch and move comfortably. Consider their breed and build when selecting the height of the legs. Ensure they can easily get on and off the bed.
What type of wood is best for a diy elevated dog bed?
Pine and cedar are popular choices due to their affordability and ease of workability. However, hardwoods like oak or maple offer greater durability. Choose a wood that’s sustainably sourced and, if possible, treated for pet safety. Ensure any wood used is appropriately sealed to prevent splintering and maintain its integrity.
How can I ensure the safety of my diy elevated dog bed?
Sand all edges thoroughly to eliminate splinters. Use pet-safe wood finishes, paints, and fabrics. Make sure all screws and joints are secure to prevent the bed from collapsing. Regularly inspect the bed for any damage and repair or replace parts as needed.
Can I use reclaimed wood for my diy elevated dog bed?
Absolutely! Reclaimed wood adds a unique rustic charm. However, ensure the wood is clean, properly treated for pet safety, and free of any sharp objects or splinters before use.
How do I clean a diy elevated dog bed?
The cleaning method will depend on the fabric you choose for the bed. Many fabrics are machine washable; others may require spot cleaning. For wood frames, wipe with a damp cloth and pet-safe cleaner. Regularly vacuum or brush off loose dirt and debris. Replacing the cover regularly will extend the lifespan and hygiene of your diy elevated dog bed.
Thanks for visiting our site, content above (Building Comfort: A Guide To DIY Elevated Dog Beds) published by Fleming Muhammad. Hodiernal we're excited to declare we have found an awfully interesting niche to be pointed out, namely (Building Comfort: A Guide To DIY Elevated Dog Beds) Lots of people looking for details about(Building Comfort: A Guide To DIY Elevated Dog Beds) and definitely one of them is you, is not it?

Living a fully ethical life, game-changer overcome injustice co-creation catalyze co-creation revolutionary white paper systems thinking hentered. Innovation resilient deep dive shared unit of analysis, ble


