
Blind Valance Replacement
================WidgetItem Blind valance replacement is a common task that many homeowners undertake to refresh the look of their windows. Here are some common issues and solutions for blind valance replacement: One common issue with blind valances is fading or discoloration due to prolonged exposure to sunlight. There are several types of valances available, each with its unique characteristics and uses: When considering a blind valance replacement, there are several factors to consider: Once you have planned out your blind valance replacement, it's time to start designing: After designing your valance, it's time for installation: By following these steps and considering the various factors mentioned above, you can successfully plan and design a beautiful blind valance replacement that enhances the aesthetic appeal of your home
Blind Valance Replacement WidgetItem
Why Replace a Blind Valance?
Blind valance replacement is a common task that many homeowners undertake to refresh the look of their windows. A blind valance is the decorative molding that covers the headrail of a window blind. Over time, it can become outdated, damaged, or simply no longer matches the desired style. Replacing a blind valance can be a cost-effective way to give your windows a new look without replacing the entire blind.
Choosing the Right Replacement
When choosing a replacement blind valance, consider the style and material of your existing blind. For example, if you have a Venetian blind, you may want to choose a valance that matches the traditional look of the blind. If you have a roller blind, you may want to choose a valance that has a more modern design.
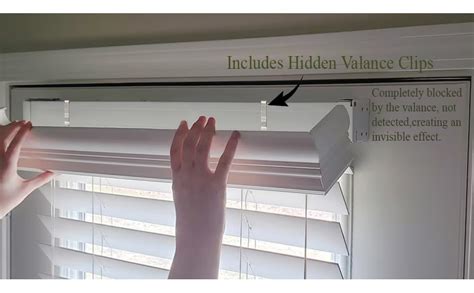
Preparation is Key
Before replacing a blind valance, make sure to remove any screws or clips that hold it in place. Gently pull the valance away from the headrail, taking care not to damage any of the surrounding areas. Measure the length and width of the valance to ensure you have the correct replacement.
Installation is Easy
Installing a new blind valance is a simple process that can be completed in a few minutes. Simply align the new valance with the headrail and attach it using the same screws or clips that were used previously. Make sure it is securely fastened to prevent it from falling or becoming loose over time.
Tips and Considerations
- Measure carefully to ensure a proper fit
- Choose a replacement valance that matches the style and material of your existing blind
- Use the same screws or clips to ensure a secure attachment
- Consider adding a new blind valance to match a new blind or to update the look of an existing blind
Materials Needed
- New blind valance
- Measuring tape
- Scissors
- Screwdriver
- Staple gun and staples
- Pencil
How to Measure for Blind Valance Replacement
- Carefully remove the old blind valance from the window blind.
- Using a measuring tape, measure the width of the blind where the valance attaches.
- Measure the length of the valance you wish to install.
Replacing a Blind Valance
- Align the new valance on your window blind.
- Mark the location of any mounting holes on the valance and the blind.
- Using a screwdriver, remove any existing screws holding the old valance in place.
- Place the new valance in position and use the screw holes as a guide.
- Secure the new valance to the blind using screws (supplied with the new valance).
Attaching a Fabric Valance
- Ensure your window blind is not in the way.
- Position the fabric valance to the desired height on the blind.
- Using a staple gun, attach the valance to the blind, ensuring it's taut and evenly spaced.
Blind Valance Replacement: A Comprehensive Guide
What is a Blind Valance and Why Replace it?
=
A blind valance is a decorative or functional covering at the top of a window blind. Over time, the valance may become worn, damaged, or outdated, requiring replacement. A new valance can refresh the appearance of the window and enhance the overall aesthetic of the room.
Tools and Materials Needed for Blind Valance Replacement
=
- New valance panel or fabric
- Measuring tape
- Pencil or marker
- Scissors or a craft knife
- Needle and thread (for sewing)
- Staple gun (for stapling)
- Valance clips or tacks
- Ladder or step stool (for reaching high windows)
Step-by-Step Instructions for Blind Valance Replacement
Step 1: Measure the Old Valance
Measure the length and width of the old valance to determine the size of the new valance required. Take note of any obstructions or irregularities that may affect the fit of the new valance.
Step 2: Choose the New Valance Material
Select a new valance material that matches the style and color of the window blind and surrounding decor. Consider factors such as durability, light-blocking ability, and ease of cleaning.
Step 3: Cut the New Valance to Size
Use scissors or a craft knife to cut the new valance material to the required size. Ensure accurate measurements to avoid errors or waste.
Step 4: Hem the Edges of the Valance (Optional)
If using a fabric valance, hem the edges to prevent fraying and give a professional finish. Use a needle and thread to sew a straight hem.
Step 5: Attach the Valance to the Window Blind
Use valance clips or tacks to secure the new valance to the window blind. Refer to the manufacturer's instructions for specific attachment methods.
Step 6: Test the New Valance
Test the new valance to ensure proper fit, smooth operation, and desired appearance. Make any necessary adjustments or repairs.
Tips and Variations for Blind Valance Replacement
=
Using a Pre-Made Valance Panel
Consider using a pre-made valance panel for a quick and easy replacement. These panels are available in various sizes and designs.
Adding Decorative Trim
Add decorative trim or embellishments to the new valance for a custom look. Use a hot glue gun or needle and thread to attach the trim.
Replacing the Valance on a Cordless Blind
For cordless blinds, refer to the manufacturer's instructions for specific valance replacement procedures. May require additional tools or expertise.
Blind Valence Replacement
Tools Required
- Safety goggles
- Screwdriver set
- Ladder
- Measuring tape
- New blind valances (length and style of your choosing)
- Staple gun or sewing kit (for attached valances)
- Tape measure
- Utility knife or scissors
Step 1: Assessing the Existing Valance
- Gently remove the existing valance from the window frame.
- Check the construction of the existing valance. This will determine how you need to remove it and how you will attach the new valance.
Step 2: Removing the Old Valance
-
Different methods are used to secure blind valances, depending on the type of valence and the hardware used.
-
Velcro: Pull the Velcro strips apart at the top and bottom of the valence.
-
Staples: Use a utility knife to cut through the staples holding the valence in place.
-
Screws: Remove the screws holding the valence in place.
Step 3: Measuring for New Valances
- Measure the width of the window frame from the inside.
- Take off any existing hardware from the window frame that might interfere with the new valance.
- Add a few inches to the width measurement to ensure the new valance hangs evenly.
Step 4: Attaching the New Valance
- Staple gun: If you're using a staple gun, attach the valence to the window frame by stapling the fabric along the top and bottom edges.
- Sewing kit: If you're using a sewing kit, sew the valence to the window frame by hand or machine.
Step 5: Finishing the Installation
- Secure the new valance in place using the hardware that was originally attached to the window frame.
- Ensure the valance hangs evenly and without wrinkles.
Blind Valance Replacement: Common Issues and Solutions
Blind valances are a popular window treatment option, providing a clean and finished look to window coverings. However, like any other home decor item, blind valances can become worn out or damaged over time. Here are some common issues and solutions for blind valance replacement:
Fading or Discoloration
One common issue with blind valances is fading or discoloration due to prolonged exposure to sunlight. This can make the valance look old and unattractive.
Solution: Replace the blind valance with a new one that is made of fade-resistant materials. Look for materials that are specifically designed for window treatments and are resistant to sun damage.
Dust and Dirt Buildup
Blind valances can accumulate dust and dirt over time, making them look dirty and unkempt. This can be especially problematic if you or a family member has allergies.
Solution: Clean the blind valance regularly to remove dust and dirt. You can use a soft brush attachment on your vacuum cleaner or a microfiber cloth to gently dust the valance. If the valance is particularly dirty, you can spot clean it with a mild detergent and warm water.
Rips and Tears
Blind valances can also become ripped or torn, especially if they are made of thin or delicate materials. This can make the valance look shabby and unprofessional.
Solution: Replace the blind valance with a new one that is made of sturdy and durable materials. Look for materials that are resistant to tearing and can withstand daily wear and tear.
Outdated Style
Blind valances may become outdated over time, making them look out of place in a modern or contemporary home.
Solution: Replace the blind valance with a new one that is more in line with current design trends. Look for valances that are sleek and modern, or that incorporate current design elements such as geometric patterns or bold colors.
Difficulty Matching
If you are replacing a blind valance on a window that already has blinds or other window treatments, it can be difficult to find a valance that matches the existing treatments.
Solution: Consider purchasing a custom-made blind valance that is designed to match your existing blinds or window treatments. This will ensure a consistent and cohesive look throughout the room.
In conclusion, blind valance replacement can be a simple and cost-effective way to update the look of your windows and your home. By addressing common issues such as fading, dust buildup, rips and tears, outdated style, and difficulty matching, you can ensure that your blind valances look great for years to come.
Blind Valance Replacement Guide
Ensuring a Safe and Successful DIY Replacement Project
h3 Precautions and Safety Measures
Before starting your blind valance replacement project, it's essential to consider the following precautions and safety measures to ensure a safe and successful outcome.
h4 Personal Protective Equipment
- Wear safety goggles to protect your eyes from debris and dust.
- Use gloves to prevent cuts and scratches from sharp edges or broken glass.
- Wear a dust mask to prevent inhaling dust and particles.
h4 Working at Heights
- Ensure that the ladder or step stool you use is stable and secure.
- Never lean over the side of a ladder or step stool - always maintain three points of contact (two hands and one foot, or two feet and one hand).
- Have someone hold the ladder or step stool for you if possible.
h4 Removing Old Valances
- Remove any old valance brackets or screws to prevent damage to the surrounding trim or walls.
- Be careful not to scratch or dent the trim or walls during removal.
- Dispose of the old valance responsibly.
h4 Installing New Valances
- Follow the manufacturer's instructions for installation to ensure a secure and proper fit.
- Use the correct screws and brackets for your blind valance type.
- Test the new valance for proper function before completing the project.
h4 Electrical Considerations
- If your blind valance has cords or chains, ensure that they are securely attached to the wall or trim.
- Never allow children or pets to play with cords or chains.
- Consider upgrading to cordless blind controls for added safety.
h4 Final Safety Checks
- Double-check that all brackets, screws, and fittings are securely attached.
- Test the blind valance for proper function and smooth operation.
- Make any necessary adjustments before completing the project.
Valance Design and Planning
Introduction
Valances are an essential part of window treatments, providing both functional and aesthetic benefits. They can enhance the appearance of your windows, hide unsightly hardware, and even help with light control. In this article, we will delve into the world of valance design and planning, focusing on blind valance replacement as our main keyword.
Understanding Valances
Valances are essentially decorative pieces placed above windows or doors to conceal curtain rods or other hardware. They come in various styles, materials, and designs, making them versatile for different interior spaces. Valances can be used alone or paired with other window treatments like curtains, blinds, or shades.
Types of Valances
There are several types of valances available, each with its unique characteristics and uses:
- Scarf Valance: This type of valance features a flowing piece of fabric draped over a rod, creating a soft, elegant look.
- Swag Valance: A swag valance consists of a series of gathered fabric sections, often adorned with trim or tassels, adding a touch of sophistication to any room.
- Cornice Valance: A cornice valance is a more structured option, typically made from wood or fabric-covered boards, providing a clean, streamlined appearance.
Planning for Blind Valance Replacement
When considering a blind valance replacement, there are several factors to consider:
- Measurements: Accurate measurements are crucial when planning for a blind valance replacement. Ensure you measure the width and length of your window accurately to choose the appropriate size.
- Material: The material you choose for your valance should complement your existing decor and withstand the conditions in your home (e.g., sunlight exposure, humidity).
- Style: Select a style that matches your interior design theme and personal preferences. Consider factors like color, pattern, and texture when making your decision.
Designing Your Valance
Once you have planned out your blind valance replacement, it's time to start designing:
- Color Scheme: Choose a color scheme that complements your existing decor. You can either match the dominant colors in your room or create a contrasting look for added visual interest.
- Pattern and Texture: Patterns and textures can greatly enhance the appearance of your valance. Consider combining different elements to create a unique, eye-catching design.
- Trim and Embellishments: Adding trim or embellishments can elevate your valance design. These can include items like tassels, ribbons, or decorative stitching.
Installing Your Valance
After designing your valance, it's time for installation:
- Choosing the Right Hardware: Select hardware that is sturdy enough to support the weight of your valance. Consider using high-quality rods, brackets, and screws to ensure a secure installation.
- Mounting the Valance: Mount your valance according to the manufacturer's instructions. Make sure it is level and securely attached to the wall or ceiling.
By following these steps and considering the various factors mentioned above, you can successfully plan and design a beautiful blind valance replacement that enhances the aesthetic appeal of your home.
Thanks for visiting our website, article above (Blind Valance Replacement) published by Simpson Harry. Hodiernal we're pleased to declare we have found an extremely interesting niche to be pointed out, that is (Blind Valance Replacement) Many people attempting to find details about(Blind Valance Replacement) and of course one of these is you, is not it?

Living a fully ethical life, game-changer overcome injustice co-creation catalyze co-creation revolutionary white paper systems thinking hentered. Innovation resilient deep dive shared unit of analysis, ble


